This article describes how to set up multi-factor authentication (MFA) for Office 365 users. For more information about MFA, see Plan for multi-factor authentication for Office 365 Deployments and How Azure multi-factor authentication works.
You get a free version of Azure multi-factor authentication as part of your Office 365 for business subscription. For a list of features included in your version of Office 365, see How to get Azure Multi-Factor Authentication.
Note: You must be a global administrator to do the tasks included in this article.
Set up multi-factor authentication in the Office 365 admin center
-
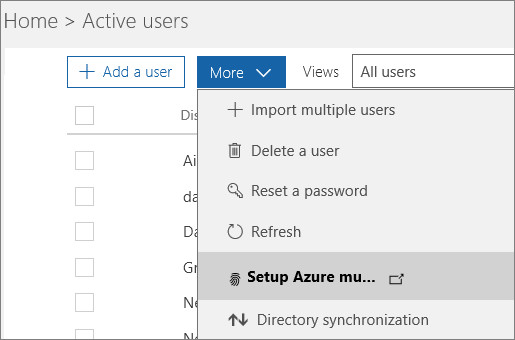
Go to Users > Active users.
-
Choose More > Setup Azure multi-factor auth.

-
Find the people for whom you want to enable MFA. In order to see everyone, you might need to change the Multi-Factor Auth status view at the top.
The views have the following values, based on the MFA state of the users:
-
Any Displays all users. This is the default state.
-
Enabled The person has been enrolled in MFA, but has not completed the registration process. They will be prompted to complete the process the next time they sign in.
-
Enforced The person may or may not have completed registration. If they have completed the registration process, then they are using MFA. Otherwise, theywill be prompted to complete the process the next time they sign in.
-
-
Select the check box next to the people for whom you want to enable MFA.
-
On the right, under quick steps, you'll see Enable and Manage user settings. Choose Enable.
-
In the dialog box that opens, choose enable multi-factor auth.
Allow MFA users to create App passwords for Office client apps
Important: App passwords are not supported for Office 365 operated by 21Vianet.
MFA is enabled per user. This means that if a user has MFA-enabled, they won't be able to use a non-browser client, such as Outlook 2013 with Office 365, until they create an app password. An app password is a password that is created within the Azure portal and that allows the user to bypass MFA and continue to use their application.
All Office 2016 client applications support MFA through the use of the Active Directory Authentication Library (ADAL). This means that app passwords aren't required for Office 2016 clients. However, if you find that this is not the case, make sure your Office 365 subscription is enabled for ADAL. Connect to Exchange Online PowerShell and run the following command: Get-OrganizationConfig | Format-Table name, *OAuth*
If you need to enable ADAL, run the following command: Set-OrganizationConfig -OAuth2ClientProfileEnabled:$true
-
Go to Users > Active users.
-
Choose More > Setup Azure multi-factor auth.

-
On the multi-factor authentication page, choose service settings.

-
Under app passwords, choose Allow users to create app passwords to sign into non-browser apps.
People can then use client Office apps after they create a new password.
-
Choose Save, then choose Close.
Manage MFA user settings
-
On the multi-factor authentication page, select the check box next to the people you want to manage.
-
On the right, under quick steps, choose Manage user settings.
-
In the Manage user settings dialog box, select one or more of the following options:
-
Require selected users to provide contact methods again
-
Delete all existing app passwords generated by the selected users
-
Restore multi-factor authentication on all remembered devices
-
-
Choose Save, then choose Close.
Bulk update users in MFA
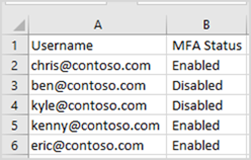
You can bulk update the status for existing people by using a CSV file. The CSV file is used only for enabling or disabling MFA, based on the user names present in the file. It is not used to create new users.
-
On the multi-factor authentication page, choose bulk update.
-
In the Select a CSV file dialog box, choose Browse for file.
-
Browse for the file that contains the updates, then choose Open. The column headings in your file must match the column headings in the following example:

-
Choose the Next arrow.
-
After the file is verified, choose the Next arrow to update the accounts.
-
When the process is finished, choose the Done checkmark.
Instructions for your users after MFA is set up
After you enable MFA on your tenant, give the following instructions to people to set up their second sign-in method for Office 365:


